How do I turn spreadsheets into lat/long coordinates?

Spreadsheet geocoding is the easiest way to convert a CSV file into lat/long coordinates in bulk. Rather than entering your data one by one on a geocode provider's website, the answer to this problem is something called "batch processing," which allows you to quickly and painlessly enter your data all at once via an upload.
Here at Smarty, we process your batches for you (that's addresses, not cookies). It's a cinch, but we wanted to make it even simpler. You can test our tools here or continue reading below for a more in-depth explanation of spreadsheet geocoding processes.
| Spreadsheet geocoding: CSV, TXT, XLSX, XLS, etc., file upload web interface | Spreadhseet geocoding: Command-line interface | Batch convert addresses to lat long - Google Sheets Add-on | Batch convert addresses to lat long - Excel Add-in |
|---|---|---|---|
Roll your sleeves down because this is going to require little to no effort on your part. In this article, we’ll cover:
- Web interface - Spreadsheet geocoding online
- Command-line interface (CLI) - Geocode CSV
- Excel - Convert address to coordinates
- Google Sheets - Convert address to coordinates
- Sweat-free conclusion
Web interface - Spreadsheet geocoding online
Web interface: With an easy file upload, you can standardize and validate your addresses while enriching them with additional data like latitude and longitude coordinates and more. The tool handles CSV files with up to 500,000 addresses and Excel files with up to 100,000, making it simple to process large datasets efficiently.
Web interface walkthrough
Here’s the drive-by version of how to use this interface to attain spreadsheet geocodes:
- Prep your data by organizing it into columns with the top row being column titles
- Save your file in any of these formats: .xls .xlsx .csv .tsv .psv .txt
- Go to https://www.smarty.com/products/list#try and upload your file
- Click, “PROCESS MY LIST”
Ta-da! Just like magic, you will now have a geocoded CSV (or whatever file type you chose) to enrich your address lists. For a more in-depth look at this process (with pictures to ooh and ahh) you can read more here!
Command-line interface (CLI) - Geocode CSV
Command-line interface: If you have large lists of addresses to process, and you have some experience with the command line, our CLI is the way to go. Each address processed will count as one "lookup" from your US or international subscription.
Command-line interface walkthrough
While CLI can handle limitless amounts of requests, it takes a little bit more time—and a little bit more tech know-how—to get it up and running. If you get clammy hands and start sweating whenever you hear a phrase like "defragmenting the hard drive," then you have scrolled past the answer you need. Please hang up and try again.

For those of you who know recursion is self-referential (like this joke), you're probably familiar enough with a command prompt that discussing how to use one doesn't drain the blood from your face. So here's how to use the Command-Line Interface, broken into 4 parts.
- Get the tool
Checkmate in three moves:
- Sign up and log in
- Download the Command-Line Interface
- Unzip and install (more details here)
We'd get fancy with extra words and details here, but someone beat us to it.
- Open the command line on your computer
- Do you know how to do this step? If answer=true, move on to the next section.
- If answer=false, shouldn't you be reading the other bulk validation methods?
- Use the tool
- Once you've sorted out the above details and gotten your config.json file set up, open the command line. (If you're wondering why there are no pictures here, see above.)
-
Enter the command
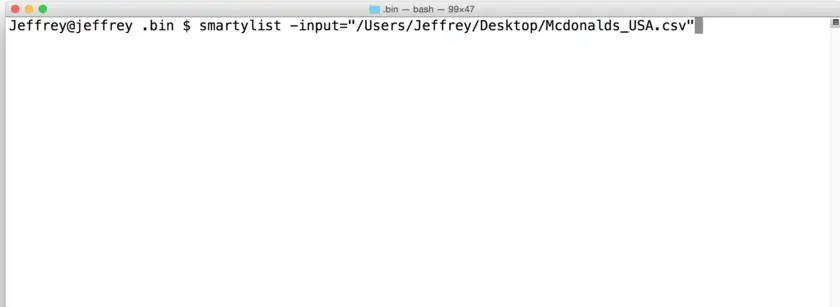
smartylist -input="path/to/your/file/here". (You can see a complete run-down of Command-Line Flags here.)

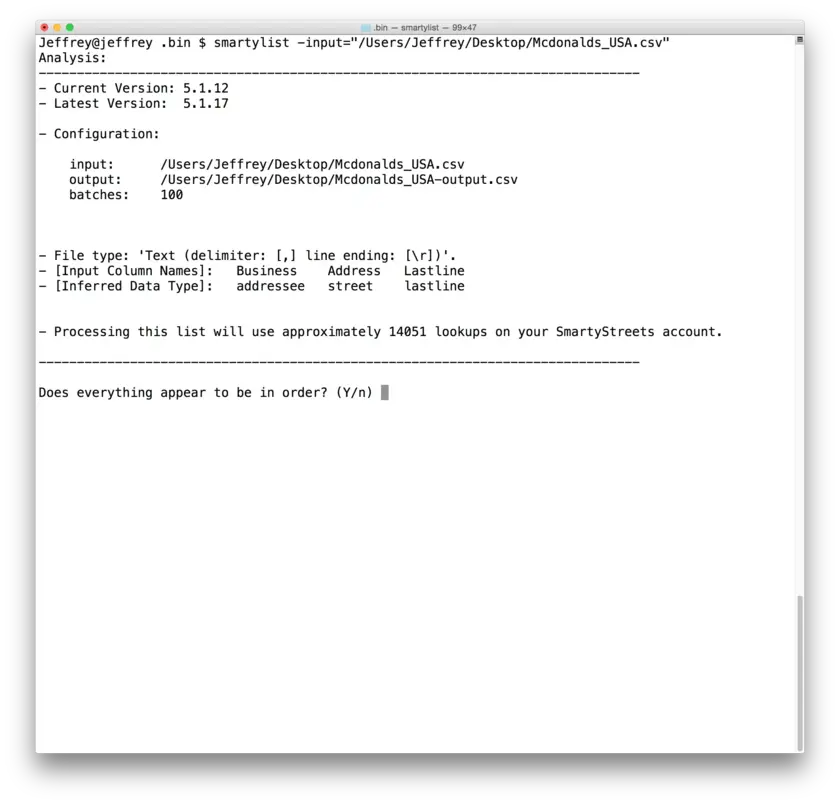
- Hit enter. The tool will give a summary of what it's about to run. Check to make sure everything looks right. If yes, enter "y".

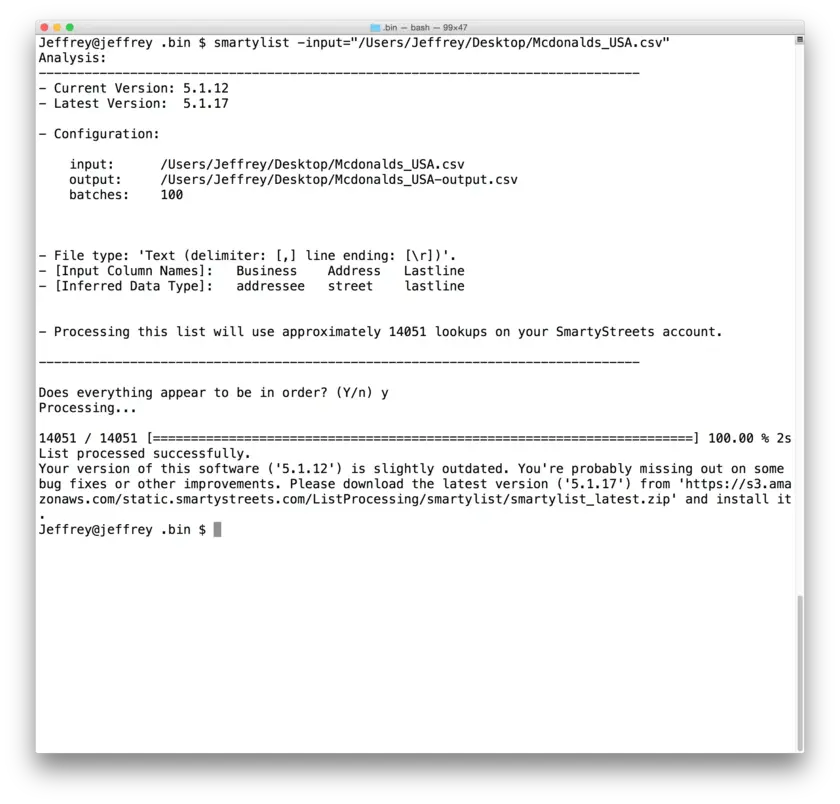
- Wait for it to process. (Less "elevator music" and more "Ding! You’re here.")

- You're done! Gee, that didn't even give you time to grab a drink. In any case, your spreadsheet geocodes (along with some other address mumbo-jumbo) will materialize in a new file labeled "output" (don't want to overwrite the original) in the same place the input file came from.
Excel - Convert address to coordinates
If you’re using Excel for your spreadsheet building, we have a BRAND-NEW add-in for you to use right in Excel! Follow the 6 simple steps below, or read an in-depth explanation of this process (complete with pictures, of course). Choose your adventure now!
- Open Excel and navigate to the “Home” tab. Select “Add-ins.”
- Search for “Smarty Address Verification” and click “Add.” Follow the prompts and reopen Excel.
- Back in Excel, click “Home” → “Add-ins” → and finally “Smarty Address Verification.”
- If you don’t have one already, sign up for a free account with Smarty and create a new secret key under “API Keys” on the account dashboard. If you do, simply create the new secret key as described.
- Add the secret key’s “auth id” and “auth token” to the Excel add-in by selecting “Show Tools” → “Enter Credentials.” After entering the credentials, submit.
- Enter each address in a single column, on address per cell. Highlight what you want to validate and click “Validate Selected Addresses.”
The returned metadata will include a bunch of cool stuff, but the spreadsheet geocoding will have its own, fancy column.
Google Sheets - Convert address to coordinates
If you’re using Google Sheets to manage your spreadsheets, we have a BRAND-NEW plugin for you! Neat. You can follow these 5 steps below or dig deeper into the spreadsheet geocoding process (Google Sheets) and see some pretty visuals here. Choose wisely, but also feel free to choose both.
- Download Smarty’s Google Sheets address validation and geocoding extension from the Google Workspace Marketplace. Follow their prompts.
- If you don’t have one yet (first off, why?), sign up for a free account with Smarty. Create a new secret key under “API Keys” on the account dashboard.
- Open Google Sheets, go to the “Extensions” tab, then go to “Smarty Address Verification,” and “Add Credentials.”
- Add your secret key’s “auth id” and “auth token” to the plugin by clicking on “Enter Credentials.” Submit it!
- Enter each address in a single column. (Only one address can be in each cell.) Highlight the rows you’d like to validate and click “Validate Selected Addresses.”
See? Only 5 steps. You’ve got this. Enjoy reviewing your spreadsheet geocodes while thinking about other ways you might be killing it today.
Sweat-free-conclusion
Processing large lists of addresses with Smarty is quick and simple because we don't like things to be slow or difficult. That's why none of us has ever climbed Everest.
This has been an egregious exercise in over-simplification. We hope you've enjoyed it as much as we have, and that you’ve found at least one way to get your spreadsheet geocoding done faster than any of the other guys.
And if anyone asks… no, this article is not purposefully recursive.
Note: If you’re still feeling somewhat fuzzy, call our legendary support team, and real, off-script humans will walk you through what to do without making you feel like an idiot. 😀