Implementing US Address Autocomplete in HubSpot
I'm a marketer. I've been using CRMs with crazy amounts of power to make marketing activities easier to execute and track. However, a CRM is only as good as the data that goes into it, and sometimes, that requires some fancy footwork to try and reduce human error.
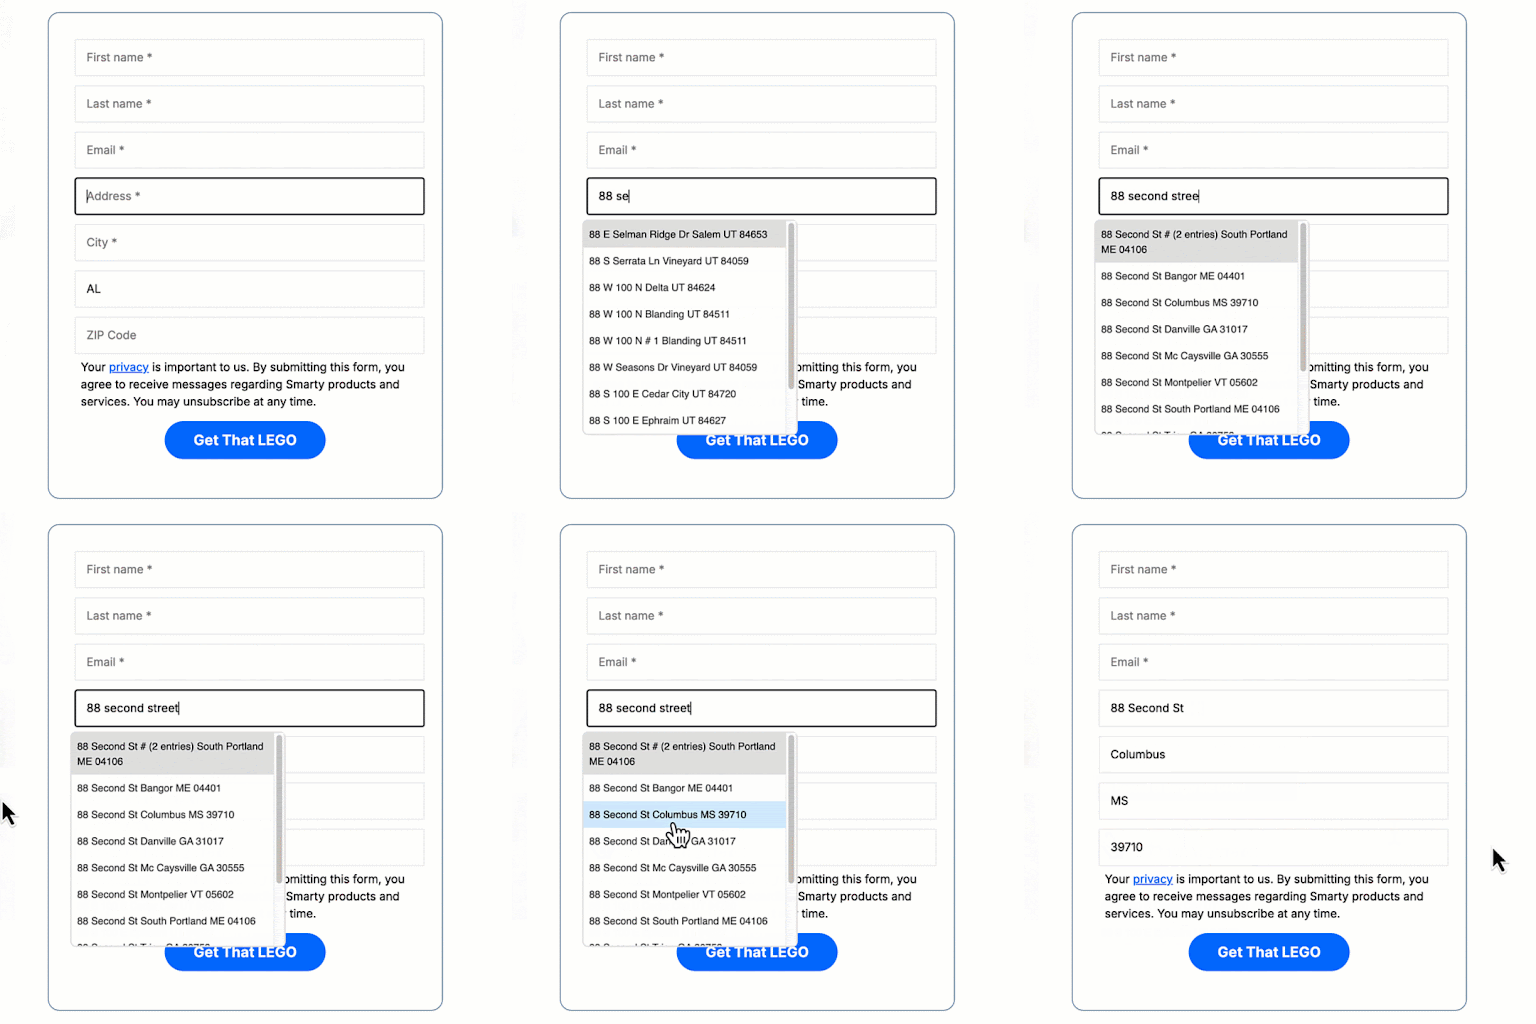
This guide is to help you with the fancy footwork of procuring better address data quality by getting a marketing form to include address autocomplete.
| Try Us Address Verification | Try US Address Autocomplete | Try International Address Autocomplete |
|---|---|---|
In this article, we'll cover some important things:
- Concepts to be aware of
- Prepping your page
- Pasting code to make the form
- Paste magic JavaScript code to make it all work
- The editable parts
- Connects the HTML form with a HubSpot form
- Set confirmation page URL and make fields required
- Connect autocomplete to Smarty
- Postal addresses only
- Hit publish on your landing page
Some of the best tools we marketers use are forms. Marketing teams use landing page forms to offer data, trials, and tools in exchange for information from people. Want a killer insurance guide, a free trial of services, or maybe a phone call from us? Give us your contact information, and we'll hook you up.
Up until now, getting validated address forms for direct mail campaigns or other activities into a CRM has been a huge pain.
If you're marketing for a lawn care company and you want your customers to put their addresses into your signup form before you start working with them, you used to have to use an open text field.
You know, as well as I do, that there's always a chance there'll be entry errors or they'll put the wrong address together. Or maybe your sales team needs to know where your customers are for routing or districting. You can get that information directly through your contact forms, but there's a chance someone will put in a fake address, leading to poor data quality.
Human error and entry errors, am I right?
Those issues can stop today.
You can create a good user experience, get valid addresses, and still have slick-looking form fields that match your brand and inform your CRM.
Here's how to get Smarty's US Address Autocomplete working on a form in HubSpot. Yes, this is for HubSpot, but the principles are the same and can be transferred to other form-creating tools as long as you have access to the HTML editor for said tool.
Here we go.
1. Concepts to be aware of
We won't be plugging anything magical into a native HubSpot form. To quote HubSpot's support team, "If you’re using HubSpot's default form builder, you can’t directly edit the form's HTML or JavaScript within the HubSpot interface. However, you can use custom HTML forms embedded in HubSpot to achieve this."
That means we won't be using HubSpot's actual form too.
But how do I get my properties to populate on a form?
We're going to embed some custom HTML on a landing page, making our own landing page form (you can style that HTML form to match whatever you want). Then, we're going to use HubSpot's form API to complete a 'form' as the CRM understands it. It's going to be a slick user experience, I promise. All of this will be possible with some JavaScript code that we'll put on the landing page.
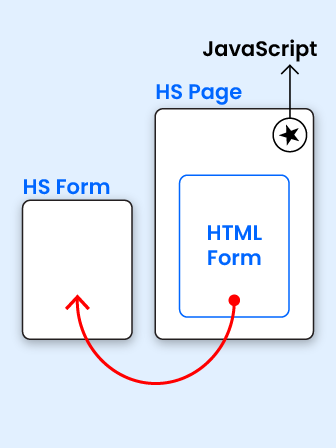
The HTML will be used to create the form that your users will fill out.
The JavaScript will do four things:
- Call the Smarty API to display addresses to the user in real-time
- Give a warning if the user doesn't complete the entire form
- Filter possible address results to what you want them to be
- Connect with your HubSpot form so it counts as a form completion
But I'm not an HTML or JavaScript expert.
That's fine; neither am I. We'll get through this together, pookie.
2. Prepping your page
For this example, we'll use a HubSpot landing page. Really, any page where you can insert an HTML element and have access to the footer will work. There are a lot of examples of landing pages out there if you're not sure where to start, but in HubSpot:
- Create a new landing page and drag a "Rich Text" module into wherever I want the form to be. Next, wipe the whole thing to be blank.
As mentioned in step 1, we will NOT be placing a HubSpot form on this page. This rich text block will become the actual form, and we'll use some code to complete a HubSpot form that is NOT on this page.
To be clear: DO NOT PUT A FORM ON THIS PAGE. I'm looking at you, Kajsia.
-
You will need a form in the forms section of HubSpot to map the results to, so create one if you
haven't already. The coded form below includes the following fields, so you'll want to make sure
your HubSpot form has at least these fields to map to as well:
- First name
- Last name
- Email address
- Address line
- City
- State
- Zip Code/Postal code
- These are the bare minimum fields. You can add as many optional fields as you like to your HubSpot form; you will just need to make sure that the code blocks below can communicate the information to those optional fields. I won't be walking you through that process, but there are patterns in the code that you can follow for this.
Suggestion: Use the form creation tool rather than creating the form on the landing page itself. You'll be less likely to get hung up.
3. Pasting code to make the form
Now, on the landing page—with the "Rich Text" module selected—click "Advanced" and then "Source code." This is where you can paste the HTML that will make up our form.
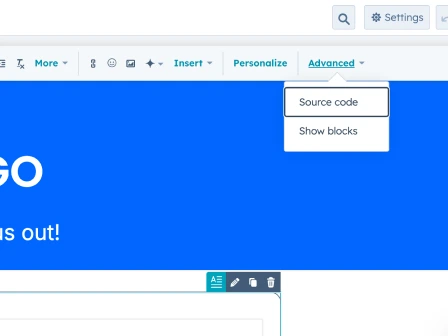
This is when we build the HTML form. Copy the following code and paste it into the "Source code" block section of your rich text block. This is going to be styled in a very simple way, but you can change it to look however you like by changing the HTML.
	<form id="myCoolForm" style="padding: 30px; border: 1px solid #476884; border-radius: 16px;"><input id="myCoolFirstname" style="padding: 15px; margin: 6px; border: 2px solid #eee; border-radius: 2px;" type="text" placeholder="First name *"> <input id="myCoolLastname" style="padding: 15px; margin: 6px; border: 2px solid #eee; border-radius: 2px;" type="text" placeholder="Last name *"> <input id="myCoolEmail" style="padding: 15px; margin: 6px; border: 2px solid #eee; border-radius: 2px;" required="" type="text" placeholder="Email *"> <input id="myCoolAddress" style="padding: 15px; margin: 6px; border: 2px solid #eee; border-radius: 2px;" type="text" placeholder="Address *"> <input id="myCoolCity" style="padding: 15px; margin: 6px; border: 2px solid #eee; border-radius: 2px;" type="text" placeholder="City *"><select id="myCoolState" style="padding: 15px; margin: 6px; border: 2px solid #eee; border-radius: 2px;">
		<option value="AL">AL</option>
		<option value="AK">AK</option>
		<option value="AZ">AZ</option>
		<option value="AR">AR</option>
		<option value="CA">CA</option>
		<option value="CO">CO</option>
		<option value="CT">CT</option>
		<option value="DE">DE</option>
		<option value="FL">FL</option>
		<option value="GA">GA</option>
		<option value="HI">HI</option>
		<option value="ID">ID</option>
		<option value="IL">IL</option>
		<option value="IN">IN</option>
		<option value="IA">IA</option>
		<option value="KS">KS</option>
		<option value="KY">KY</option>
		<option value="LA">LA</option>
		<option value="ME">ME</option>
		<option value="MD">MD</option>
		<option value="MA">MA</option>
		<option value="MI">MI</option>
		<option value="MN">MN</option>
		<option value="MS">MS</option>
		<option value="MO">MO</option>
		<option value="MT">MT</option>
		<option value="NE">NE</option>
		<option value="NV">NV</option>
		<option value="NH">NH</option>
		<option value="NJ">NJ</option>
		<option value="NM">NM</option>
		<option value="NY">NY</option>
		<option value="NC">NC</option>
		<option value="ND">ND</option>
		<option value="OH">OH</option>
		<option value="OK">OK</option>
		<option value="OR">OR</option>
		<option value="PA">PA</option>
		<option value="RI">RI</option>
		<option value="SC">SC</option>
		<option value="SD">SD</option>
		<option value="TN">TN</option>
		<option value="TX">TX</option>
		<option value="UT">UT</option>
		<option value="VT">VT</option>
		<option value="VA">VA</option>
		<option value="WA">WA</option>
		<option value="WV">WV</option>
		<option value="WI">WI</option>
		<option value="WY">WY</option>
	</select><input id="myCoolZip" style="padding: 15px; margin: 6px; border: 2px solid #eee; border-radius: 2px;" type="text" placeholder="ZIP Code">
	<div style="padding-bottom: 15px; padding-left: 15px;">Your <a href="https://YOUR PRIVACY POLICY LINK GOES HERE">privacy</a> is important to us. You agree to receive messages regarding our products and services by submitting this form. You may unsubscribe at any time.</div>
	<div style="text-align: center;"><button id="myCoolButton" style="background-color: #0066ff; color: white; padding: 15px 40px; font-size: 20px; font-weight: bold; border: none; border-radius: 90px; cursor: pointer; display: inline-block; text-align: center; text-decoration: none;">SUBMIT</button></div>
	</form>
You can also find this information on GitHub.
This contains the actual form that includes each state (we're doing US Address Autocomplete, and you can do this for International as well, but you'd need to change certain things), as well as the details and design of the form. If you want to change the way the form looks, you can paste this into ChatGPT and include a picture of another form that you want it to look like, and ChatGPT can suggest the changes you'll need to make.
You'll also notice in the bottom bit of that code a line that says "<a href="https://YOUR PRIVACY POLICY LINK GOES HERE">"
This is where you'll paste in the URL of your company privacy statement if you want to have that there.
4. Paste magic JavaScript code to make it all work
We're one step closer to valid addresses, but we're not there yet. While the above code did build the form, and it may look pretty and ready to go, it still doesn’t have that sweet, sweet, magical autocomplete, and completing it won’t connect to your CRM. To do so, we have to add some JavaScript.
There’s a new place where you'll paste this code. When you click the "Settings" button for the landing page at the top and then click "Advanced," you'll see the "Head HTML" and "Footer HTML" blocks under "Additional code snippets."
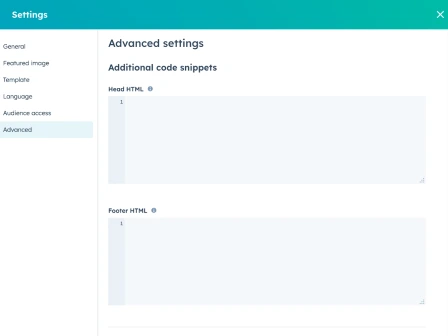
Copy and paste the following code into the "Footer HTML" block section in the Settings.
For you fancy-pants programmers out there thinking, "Wow, that's a lot of code, why not just…" Two things:
- This isn't for you. Do it yourself if you're so smart.
- HubSpot has some restrictions on what external code can be pulled in.
There’s quite a bit more code here than would normally be needed due to HubSpot's restrictions on what external code can be pulled in.
So copy and paste all of the following code into the "Footer HTML" block section in the "Settings".
	<script>

		// HubSpot Settings - change stuff between the quotes after the equals sign (keep the quotes).
		const MY_COOL_HUBSPOT_FORM_ID = 'YOUR HUBSPOT FORM ID';
		const MY_COOL_HUBSPOT_PORTAL_ID = 'YOUR HUBSPOT PORTAL ID';
		const MY_COOL_CONFIRMATION_PAGE = 'YOUR CONFIRMATION PAGE URL BEGINNING WITH https://';
		const MY_COOL_ERROR_MESSAGE = 'All fields are required.';
		// Smarty Settings - change stuff between the quotes after the equals sign (keep the quotes).
		const MY_COOL_SMARTY_EMBEDDED_KEY = 'YOUR SMARTY EMBEDDED KEY GOES HERE';
		const MY_COOL_SMARTY_SOURCE = 'postal'; // valid options are 'postal' or 'all'

		// ------ DON'T MODIFY BELOW THIS LINE ------

		document.getElementById('myCoolButton').addEventListener('click', (e) => {
			e.preventDefault();
			submitData();
		});
		async function submitData() {
			const url = `https://api.hsforms.com/submissions/v3/integration/submit/${MY_COOL_HUBSPOT_PORTAL_ID}/${MY_COOL_HUBSPOT_FORM_ID}`;
			const headers = {
				'accept': 'application/json',
				'content-type': 'application/json',
			};
			const data = {
				"fields": [{
					"name": "firstname",
					"value": document.getElementById('myCoolFirstname').value
				},
					{
						"name": "lastname",
						"value": document.getElementById('myCoolLastname').value
					},
					{
						"name": "email",
						"value": document.getElementById('myCoolEmail').value
					},
					{
						"name": "address",
						"value": document.getElementById('myCoolAddress').value
					},
					{
						"name": "city",
						"value": document.getElementById('myCoolCity').value
					},
					{
						"name": "state",
						"value": document.getElementById('myCoolState').value
					},
					{
						"name": "zip",
						"value": document.getElementById('myCoolZip').value
					}
				],
				"skipValidation": false,
				"context": {}
			};
			try {
				const response = await fetch(url, {
					method: 'POST',
					headers: headers,
					body: JSON.stringify(data)
				});
				if (!response.ok) {
					throw new Error(`HTTP error! status: ${response.status}`);
				}
				const responseData = await response.json();
				console.log(responseData);
				window.location.href = MY_COOL_CONFIRMATION_PAGE;
			} catch (error) {
				console.error('Error:', error);
				alert(MY_COOL_ERROR_MESSAGE);
			}
		}

		((global) => {
			let settings = {
				embeddedKey: '',
				addressId: 'address',
				cityId: 'city',
				stateId: 'state',
				zipCodeId: 'zip',
				styleBackgroundColorHexString: '#fff',
				styleColorHexString: '#333',
				styleHoverBackgroundColorHexString: '#cfe8ff',
				styleHoverColorHexString: '#000',
				styleBorderColorHexString: '#e0e0e0',
				styleBorderPixelWidthInt: 2,
				styleBorderRadiusInt: 8,
				styleFontFamilyString: 'sans-serif',
				styleFontSizePixelInt: 14,
				styleRowPaddingString: '8px',
				styleBoxPixelWidthInt: 300,
				styleBoxPixelHeightInt: 300,
				styleSelectedSuggestionColorHexString: '#000',
				styleSelectedSuggestionBackgroundColorHexString: '#ddd',
				suggestionElement: document.createElement('div'),
				suggestionId: null,
				offsetHeight: 20,
				addressElement: null,
				activeStyles: '',
				inactiveStyles: 'display: none;',
				selectedIndex: 0,
				lastAction: '',
			};
			const wrapperStyles = `
				display: inline-block;
				position: relative;
				width: 100%;
			`;
			const extendSettings = (defaults, options) => {
				// @todo ensure the options are allowed.
				return {
					...defaults,
					...options
				};
			};
			const wrapElementsWithDiv = (elementId) => {
				const knownElement = document.getElementById(elementId);
				if (!knownElement) {
					console.error(`Element with ID ${elementId} not found.`);
					return;
				}
				settings.addressElement = knownElement;
				settings.offsetHeight = knownElement.offsetHeight;
				const wrapperDiv = document.createElement('div');
				wrapperDiv.style.cssText = wrapperStyles;
				knownElement.parentNode.insertBefore(wrapperDiv, knownElement);
				wrapperDiv.appendChild(knownElement);
				knownElement.parentNode.insertBefore(settings.suggestionElement, knownElement.nextSibling);
			}
			const sendLookupRequest = async (searchValue, selected = "") => {
				const params = new URLSearchParams({
					key: settings.embeddedKey,
					search: searchValue,
					source: MY_COOL_SMARTY_SOURCE,
					selected
				});
				try {
					const request = await fetch(
						`https://us-autocomplete-pro.api.smarty.com/lookup?${params}`
					);
					const data = await request.json();
					if (data?.suggestions?.length > 0) formatSuggestions(data.suggestions);
				} catch (e) {
					console.error(e.message);
				}
			};
			const applyStyles = (element, styles) => {
				for (let property in styles) {
					element.style[property] = styles[property];
				}
			};
			const formatSuggestions = (suggestions) => {
				const {
					suggestionElement,
					inactiveStyles,
					styleRowPaddingString,
					styleHoverBackgroundColorHexString,
					styleHoverColorHexString,
					styleBackgroundColorHexString,
					styleColorHexString,
					styleFontSizePixelInt,
					styleSelectedSuggestionColorHexString,
					styleSelectedSuggestionBackgroundColorHexString,
					activeStyles,
				} = settings;
				suggestionElement.innerHTML = '';
				suggestionElement.style.cssText = activeStyles;
				const formattedSuggestions = suggestions.map((suggestion, index) => {
					const divElement = document.createElement("div");
					divElement.classList.add('smarty-suggestion');
					divElement.style['padding'] = styleRowPaddingString;
					divElement.style['fontSize'] = `${styleFontSizePixelInt}px`;
					if (index === 0) {
						applyStyles(divElement, {
							color: styleSelectedSuggestionColorHexString,
							backgroundColor: styleSelectedSuggestionBackgroundColorHexString,
						});
						settings.selectedIndex = 0;
					}
					const {
						street_line,
						city,
						state,
						zipcode,
						secondary,
						entries
					} = suggestion;
					const hasSecondaryData = secondary && entries > 1;
					divElement.innerText = `${street_line} ${secondary} ${
						hasSecondaryData ? `(${entries} entries)` : ""
					} ${city} ${state} ${zipcode}`;
					divElement.addEventListener('mouseover', () => {
						if (settings.lastAction === 'keyboard') return;
						applyStyles(divElement, {
							backgroundColor: styleHoverBackgroundColorHexString,
							color: styleHoverColorHexString,
						});
					});
					divElement.addEventListener('mouseout', () => {
						applyStyles(divElement, {
							backgroundColor: styleBackgroundColorHexString,
							color: styleColorHexString,
						});
					});
					divElement.addEventListener("click", async () => {
						const streetLineWithSecondary = `${street_line} ${secondary}`.trim();
						if (hasSecondaryData) {
							const selected = `${streetLineWithSecondary} (${entries}) ${city} ${state} ${zipcode}`;
							await sendLookupRequest(streetLineWithSecondary, selected);
						} else {
							suggestionElement.style.cssText = inactiveStyles;
						}
						populateForm({
							streetLineWithSecondary,
							city,
							state,
							zipcode
						});
					});
					return divElement;
				});
				suggestionElement.append(...formattedSuggestions);
			}
			const populateForm = ({
				streetLineWithSecondary,
				city,
				state,
				zipcode
			}) => {
				const {
					addressId,
					cityId,
					stateId,
					zipCodeId
				} = settings;
				document.getElementById(addressId).value = streetLineWithSecondary;
				document.getElementById(cityId).value = city;
				document.getElementById(stateId).value = state;
				document.getElementById(zipCodeId).value = zipcode;
			};
			const scrollWrapperToSelected = () => {
				const {
					selectedIndex,
					suggestionElement
				} = settings;
				const elements = document.getElementsByClassName('smarty-suggestion');
				if (selectedIndex >= 0 && selectedIndex < elements.length) {
					const selectedChild = elements[selectedIndex];
					const wrapperRect = suggestionElement.getBoundingClientRect();
					const selectedRect = selectedChild.getBoundingClientRect();
					// Check if selected child is above the viewport
					if (selectedRect.top < wrapperRect.top) {
						suggestionElement.scrollTop -= (wrapperRect.top - selectedRect.top);
					}
					// Check if selected child is below the viewport
					else if (selectedRect.bottom > wrapperRect.bottom) {
						suggestionElement.scrollTop += (selectedRect.bottom - wrapperRect.bottom);
					}
				}
			}
			LikeButtaSmartyUsAddressAutocomplete = (userSettings) => {
				settings = extendSettings(settings, userSettings);
				wrapElementsWithDiv(settings.addressId);
				settings.activeStyles = `
					display: block;
					position: absolute;
					overflow-y: auto;
					cursor: pointer;
					top: ${settings.offsetHeight};
					width: ${settings.styleBoxPixelWidthInt}px;
					height: ${settings.styleBoxPixelHeightInt}px;
					border: solid ${settings.styleBorderPixelWidthInt}px ${settings.styleBorderColorHexString};
					border-radius: ${settings.styleBorderRadiusInt}px;
					background-color: ${settings.styleBackgroundColorHexString};
					font-family: ${settings.styleFontFamilyString};
					color: ${settings.styleColorHexString};
				`;
				settings.suggestionElement.id = 'smartySuggestionBox';
				settings.suggestionId = settings.suggestionElement.id;
				const {
					addressElement,
					suggestionElement,
					inactiveStyles,
					activeStyles
				} = settings;
				suggestionElement.style.cssText = inactiveStyles;
				addressElement.addEventListener("keyup", (e) => {
					if ([
						'Shift', 'Control', 'Alt', 'Meta', 'CapsLock', 'Tab', 'ArrowUp', 'ArrowDown',
						'ArrowLeft', 'ArrowRight', 'Escape', 'F1', 'F2', 'F3', 'F4', 'F5',
						'F6', 'F7', 'F8', 'F9', 'F10', 'F11', 'F12'
					].includes(e.key)) return;
					if (e.key === 'Enter') {
						const elements = document.getElementsByClassName('smarty-suggestion');
						elements[settings.selectedIndex].click();
						return;
					}
					const searchValue = e.target.value;
					if (!searchValue) {
						suggestionElement.style.cssText = inactiveStyles;
						return;
					}
					sendLookupRequest(searchValue);
				});
				addressElement.addEventListener("keydown", async (e) => {
					if (!['ArrowUp', 'ArrowDown'].includes(e.key)) return;
					e.preventDefault();
					const {
						selectedIndex,
						styleColorHexString,
						styleBackgroundColorHexString,
						styleSelectedSuggestionColorHexString,
						styleSelectedSuggestionBackgroundColorHexString,
					} = settings;
					const elements = document.getElementsByClassName('smarty-suggestion');
					[...elements].forEach((element) => {
						applyStyles(element, {
							color: styleColorHexString,
							backgroundColor: styleBackgroundColorHexString,
						});
					});
					if (elements.length === selectedIndex + 1 && e.key === 'ArrowDown') {
						settings.selectedIndex = 0;
					} else if (selectedIndex === 0 && e.key === 'ArrowUp') {
						settings.selectedIndex = elements.length - 1;
					} else if (e.key === 'ArrowDown') {
						settings.selectedIndex += 1;
					} else {
						settings.selectedIndex -= 1;
					}
					applyStyles(elements[settings.selectedIndex], {
						color: styleSelectedSuggestionColorHexString,
						backgroundColor: styleSelectedSuggestionBackgroundColorHexString,
					});
					settings.lastAction = 'keyboard';
					scrollWrapperToSelected();
				});
				suggestionElement.addEventListener('mousemove', (e) => {
					settings.lastAction = 'mouse';
				});
				suggestionElement.addEventListener('mouseout', (e) => {
					const elements = document.getElementsByClassName('smarty-suggestion');
					const {
						selectedIndex,
						styleSelectedSuggestionColorHexString,
						styleSelectedSuggestionBackgroundColorHexString
					} = settings;
					applyStyles(elements[selectedIndex], {
						color: styleSelectedSuggestionColorHexString,
						backgroundColor: styleSelectedSuggestionBackgroundColorHexString,
					});
				});
				document.addEventListener('click', (e) => {
					if (!suggestionElement.contains(e.target) && !e.target.classList.contains('smarty-suggestion')) {
						suggestionElement.style.cssText = inactiveStyles;
					}
				});
			};
			global.LikeButtaSmartyUsAddressAutocomplete = LikeButtaSmartyUsAddressAutocomplete;
		})(window);
		LikeButtaSmartyUsAddressAutocomplete({
			embeddedKey: MY_COOL_SMARTY_EMBEDDED_KEY,
			addressId: 'myCoolAddress',
			cityId: 'myCoolCity',
			stateId: 'myCoolState',
			zipCodeId: 'myCoolZip',
		});
	</script>
You can also find this information on GitHub.
If you're not using HubSpot, this would be pasted in your page HTML footer.
You'll notice that there are six lines at the top of the JavaScript code above that begin with "const". They are the six easily-editable sections available, including very important ones that you'll be editing in the next step.
The JavaScript will do four things:
- Call the Smarty API to display addresses to the user in real-time,
- Give a warning if the user doesn't complete the entire form
- Filter possible address results to what you want them to be
- Connect with your HubSpot form so it counts as a form completion
5. The editable parts
In order for everything to work and be tied together, the JavaScript in the Footer HTML has to be given keys so that it can pull and push data where it needs to go. We'll go through each of these lines.
Section 1: Connects the HTML form with a HubSpot form
- const MY_COOL_HUBSPOT_FORM_ID = 'YOUR HUBSPOT FORM ID';
- const MY_COOL_HUBSPOT_PORTAL_ID = 'YOUR HUBSPOT PORTAL ID';
These two lines are where you'll make sure whatever is entered on your custom form goes into a HubSpot form. For this, you need to create a form in Hubspot that has all of the fields that you're asking for in the HTML form. (You likely did this during step 2, from first name to ZIP Code/postal code.)
Once you've finished and published the form, capture the "Form ID" and the "Portal ID." You can find it in the "Embed code" tab, but HubSpot won't let you copy just those lines.
Pro-tip: The 'portalId' can be found in the URL of any page in your HubSpot account, and if you're looking at the form in the form editor, the 'formId' will be in the URL too.
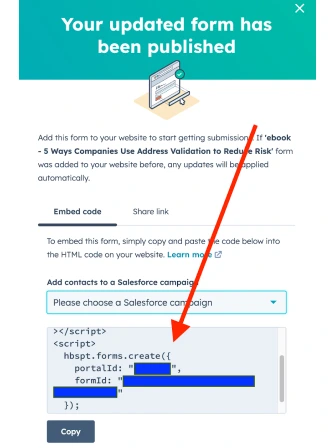
Once you have these IDs, paste them in the "YOUR HUBSPOT FORM ID" and "YOUR HUBSPOT PORTAL ID" sections. When you complete the form, it’ll complete the HubSpot form, allow you to track form submissions, and populate your property fields.
Keep the quotation marks.
Section 2: Set confirmation page URL and make fields required
- const MY_COOL_CONFIRMATION_PAGE = 'YOUR CONFIRMATION PAGE URL BEGINNING WITH https://';
- const MY_COOL_ERROR_MESSAGE = 'All fields are required.';
Upon completion, your user will be taken to a confirmation page. On the confirmation line, put in the URL of the page you want them to be redirected to. Make sure it includes the "https://" part.
If someone fills out only their first name but not the other fields, you don't want them in your CRM. This code is currently set up to throw an error if the HubSpot form says that not all required fields were completed. It knows this because of the connection you created in Section 1.
The alert says, "All fields are required." If you want it to say something else, put that in on the error message line.
Again, keep the quotation marks.
Section 3: Connect autocomplete to Smarty
- const MY_COOL_SMARTY_EMBEDDED_KEY = 'YOUR SMARTY EMBEDDED KEY GOES HERE';
Next, you'll connect your form to Smarty's US Address Autocomplete API. All you need is an embedded key from an active US Address Autocomplete subscription. You can get 1,000 free lookups, and then you can purchase more as you need them.
Once you're in your account, select API Keys in the left ribbon, and then copy your Embedded key. If you don't have one, select "Create Embedded Key" on the right, list the website that you're building your autocomplete form on as the Host, and then copy the key it creates.
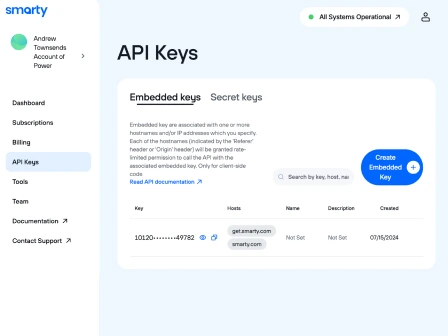
Now, simply paste that key in the "YOUR SMARTY EMBEDDED KEY HERE" spot.
Section 4: Postal addresses only
- const MY_COOL_SMARTY_SOURCE = 'postal'; // valid options are 'postal' or 'all'
This section of code is where you can apply some filters to the addresses that are presented to your user. As it is currently set up it will only suggest addresses that are in the USPS address database. If you want to include non-postals, put "all" instead of "postal."
If you want to get really fancy, there are lots of other fields you can use in JavaScript to limit the addresses presented. For example, maybe you only want it to show addresses in your state. However, these filters must be entered further down in the code and may require some coding expertise. Or maybe ChatGPT can help you?
6. Hit publish on your landing page
When you publish your page your users will be able to begin typing and instantly be suggested complete addresses. And now you're ready for your direct mail campaigns. High-quality data, here we come—your likelihood of getting the correct address skyrockets.
See? Easy.
P.S. Are you looking for additional autocomplete parameters in HubSpot? Then check out Implementing additional parameters to autocomplete in HubSpot.
